
- December 7, 2025
🥨 Ultimate Baked Soft Pretzels Recipe: Chewy, Salty & Absolutely Perfect! 😋
The Best Homemade Comfort Food Snack!
📄 Page 1: Introduction, Ingredients & Dough Prep
✨ Welcome to Pretzel Perfection!
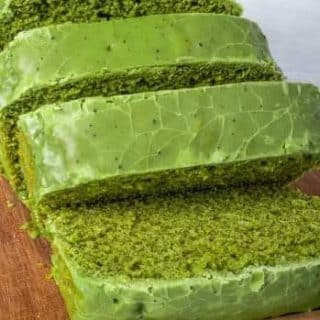
Who can resist the classic charm of a warm, golden-brown soft pretzel? That perfect balance of a chewy, slightly crisp exterior, a soft, pillowy interior, and a dusting of coarse salt… it's pure bliss! 😍 Forget the mall food court—this recipe shows you how to recreate that magical experience right in your own kitchen. Our Ultimate Baked Soft Pretzels are easy to make and guaranteed to be a hit at your next gathering, game day, or as a cozy afternoon snack. Get ready to roll up your sleeves and become a pretzel master! 👩🍳
📋 What You'll Need: The Simple Ingredients
This recipe uses basic pantry staples, but the combination yields extraordinary results.
| Ingredient | Quantity | Purpose |
| Active Dry Yeast | $2 \text{ tsp}$ | The leavening agent for that airy texture. 🌬️ |
| Warm Water | $1 \text{ 1/2 cups}$ | Activates the yeast. Should be about $105^\circ\text{F} – 115^\circ\text{F}$. |
| Granulated Sugar | $1 \text{ Tbsp}$ | Feeds the yeast and adds a hint of flavor. 🍯 |
| All-Purpose Flour | $3 \text{ cups}$ (plus more for dusting) | The structural backbone of the pretzel. |
| Fine Sea Salt | $1 \text{ tsp}$ | Flavoring the dough itself. 🧂 |
| Vegetable Oil | $1 \text{ Tbsp}$ | Adds tenderness and prevents sticking. 🌻 |
💧 The Secret to the Perfect Crust: The Lye-Free Bath
The iconic pretzel texture and color come from a quick dip before baking. We're using a safe, lye-free method.
-
Warm Water: $10 \text{ cups}$
-
Baking Soda: $1/2 \text{ cup}$ (The image specifies $1/4 \text{ cup}$, but $1/2 \text{ cup}$ gives a deeper color and flavor)
-
Coarse Pretzel Salt: For the topping. 💎
🍞 Step 1: Activating the Yeast (The Bloom)
-
In a large bowl or the bowl of a stand mixer, combine the warm water, granulated sugar, and active dry yeast.
-
Give it a gentle stir. Let it sit for $5 \text{ to } 10 \text{ minutes}$.
-
Patience is key! You should see a foamy layer form on top—this means your yeast is active and happy! 😄
🥣 Step 2: Mixing the Dough
-
Add the $3 \text{ cups}$ of all-purpose flour, $1 \text{ tsp}$ of fine sea salt, and $1 \text{ Tbsp}$ of vegetable oil to the yeast mixture.
-
By Hand: Stir with a wooden spoon until a shaggy dough forms. Turn it out onto a lightly floured surface.
-
Stand Mixer: Use the dough hook attachment and mix on low speed until the dough comes together.
knead Step 3: Kneading to Perfection
-
Knead the dough for 8-10 minutes until it is smooth, elastic, and bounces back when gently poked. It should not be sticky. If it is too sticky, add flour $1 \text{ Tbsp}$ at a time.
-
Form the dough into a smooth ball.
😴 Step 4: The First Rise (Bulk Fermentation)
-
Lightly grease a clean bowl with a little vegetable oil.
-
Place the dough ball in the bowl, turning to coat.
-
Cover the bowl tightly with plastic wrap or a clean kitchen towel.
-
Place it in a warm, draft-free spot (like a turned-off oven with the light on).
-
Allow the dough to rise for 1 to 1.5 hours, or until it has roughly doubled in size. 📈
(End of Page 1)
📄 Page 2: Shaping, Boiling & Baking Instructions
📐 Step 5: Shaping the Pretzel Dough
Once the dough has doubled, gently punch it down to release the air. 💨
-
Turn the dough out onto a lightly floured surface.
-
Divide the dough into 8 equal pieces (about $4 \text{ oz}$ each, a scale is helpful!).
-
Roll each piece into a long rope, about $24 \text{ to } 30 \text{ inches}$ in length. Try to keep the rope even in thickness.
-
The Classic Pretzel Shape:
-
Form the rope into a “U” shape.
-
Take the ends and cross them over each other.
-
Twist the crossed ends once more.
-
Bring the twisted ends down and press them firmly onto the bottom curve of the “U” to seal the shape. Watch a quick video if you're unsure! 🎬
-
-
Place the shaped pretzels on a parchment-lined baking sheet while you prepare the bath.