- April 19, 2026
Step-by-Step Instructions
1. Prepare Your Station
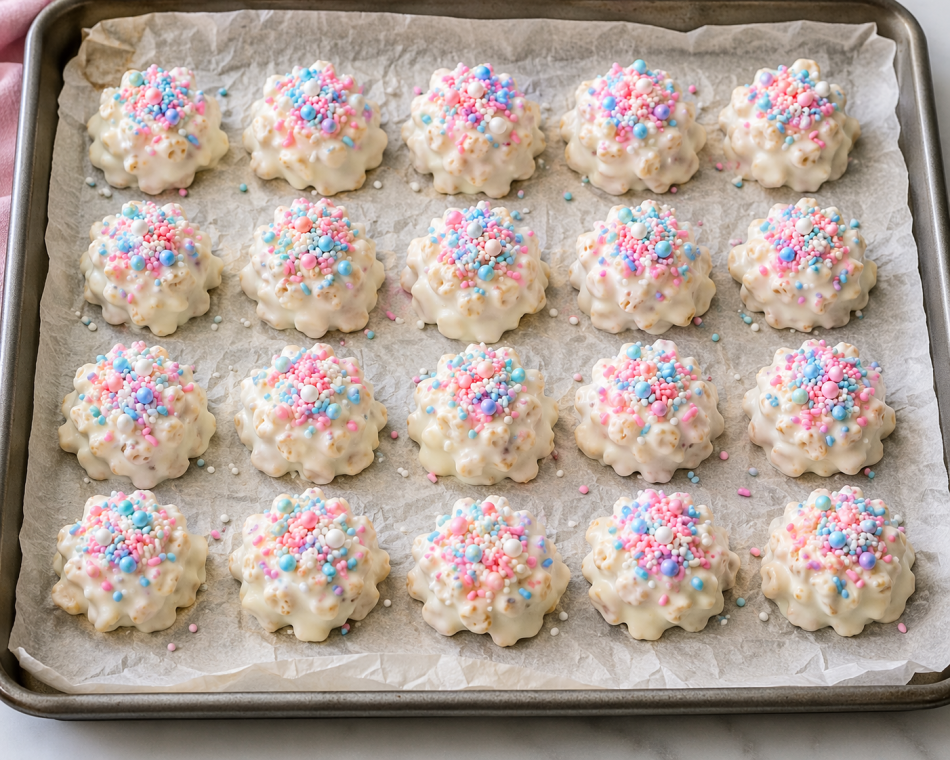
Line a large baking sheet with parchment paper or a silicone baking mat. This is crucial for easy removal once the chocolate sets. If you want perfectly uniform shapes like the ones in the image, have a small silicone mold or a rounded cookie scoop ready.
2. Melt the Chocolate
You can use a double boiler or the microwave for this step.
-
Microwave Method: Place the chocolate in a microwave-safe bowl. Heat in 30-second intervals, stirring thoroughly between each session. Stop as soon as the chocolate is mostly melted; the residual heat will melt the remaining small bits as you stir. This prevents the white chocolate from seizing or scorching.
-
Stovetop Method: Place the chocolate in a heat-proof bowl over a pot of simmering water (do not let the bowl touch the water). Stir constantly until smooth.
3. Incorporate the Crunch
Once the chocolate is silky smooth, pour in the crisped rice cereal. Use a spatula to gently fold the cereal into the chocolate until every piece is thoroughly coated. Work quickly so the chocolate doesn't begin to set while you're mixing.
4. Shape the Bites
Using a cookie scoop or two spoons, drop mounds of the mixture onto your prepared baking sheet. If you want the “fluted” look shown in the image, gently press the mixture into a small fluted silicone mold. Space them about an inch apart.
5. Add the Festive Finish
While the chocolate is still wet, generously top each mound with your pastel sprinkles. Do not wait until they are dry, or the sprinkles will simply bounce off. Lightly press them down with the back of a spoon if necessary to ensure they stick.
6. Setting and Storage
Let the bites sit at room temperature for about 30–60 minutes until firm. If you are in a hurry, you can pop the tray into the refrigerator for 15 minutes. Once hardened, store them in an airtight container in a cool, dry place.
Pro-Tips for Success
-
Avoid Water: Even a single drop of water can cause white chocolate to “seize,” turning it into a grainy, clumpy mess. Ensure your bowls and spatulas are bone-dry.
-
Flavor Boost: While the 3-ingredient version is classic, a tiny pinch of sea salt or a half-teaspoon of vanilla extract stirred into the melted chocolate can elevate the flavor profile significantly.
-
Color Variations: You can easily adapt these for other holidays by swapping the sprinkles. Use red and green for Christmas, or orange and black for Halloween.
-
The Right Cereal: If you want a heartier bite, try using cornflakes or even broken chow mein noodles for a “birds nest” effect.
Why This Recipe Works for Busy Hosts
In the world of digital food content, recipes that prioritize “high impact for low effort” always perform the best. This recipe is a perfect example of a “dump and go” dessert. It requires zero oven time, which is a massive advantage when your oven is already occupied by a holiday ham or roasted vegetables.
Beyond the ease of preparation, these bites are incredibly photogenic. The contrast between the creamy white chocolate and the vibrant pink and blue sprinkles makes them a standout addition to any dessert table or social media feed. They are light enough to enjoy after a heavy meal but sweet enough to satisfy any sugar craving.
These treats are a testament to the fact that you don't need a pantry full of ingredients to make something memorable. Sometimes, the simplest recipes—passed down through generations—are the ones that truly stand the test of time.
How do you usually like to display your holiday treats—on a rustic wooden board or a classic tiered stand?