

- December 6, 2025
♨️ step 2: prep your baking vessel and tortillas
-
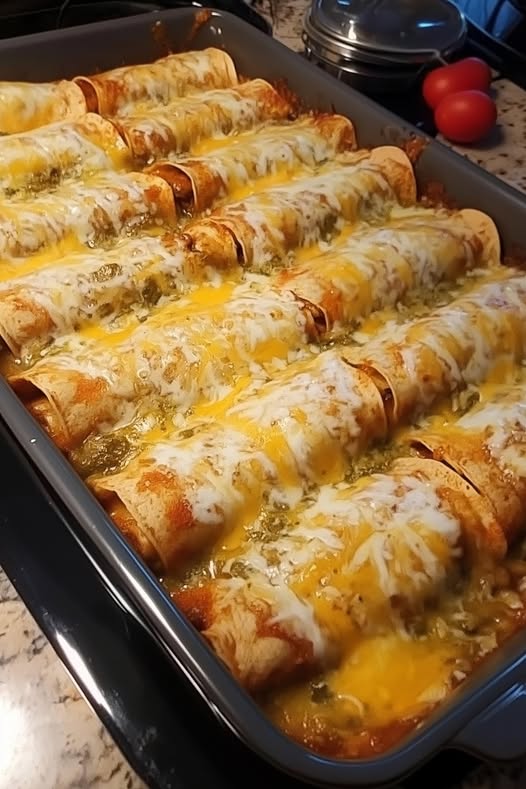
Preheat: Set your oven to $375^\circ F$ ($190^\circ C$). Grease a $9 \times 13$ inch baking dish (like the one in the picture).
-
Sauce the Dish: Pour 1/2 cup of red sauce and 1/2 cup of green sauce into the bottom of the prepared dish. Spread them to cover the base. This prevents sticking and adds flavor to the bottom of the rolls.
-
Soften the Tortillas: This is crucial to prevent cracking!
-
Method A (Authentic): Lightly fry each corn tortilla in a shallow pan with a small amount of vegetable oil for 30 seconds per side. Dip the warm tortilla directly into the sauce (red or green) and then proceed to roll.
-
Method B (Quick): Wrap the tortillas in a damp paper towel and microwave for 45-60 seconds until soft and pliable. Use the sauce from the dish to lightly coat the outside before filling. 🩹
-
(End of Page 1. Continue to Page 2 for the assembly and cooking steps.)
page 2: assembly, baking & tips 🥇
🏗️ step 3: the enchilada assembly line
Now for the fun part! This is where you create the rolls that will become the cheesy masterpiece in the photo.
-
Choose Your Sauce (The Christmas Style!): For the authentic “Christmas Style” experience, we'll use both red and green sauce on the final dish. You can choose to use one or the other for the initial rolling, or alternate! Let's go with an alternating pattern for maximum flavor diversity. 🟢🔴
-
The Fill: Take a softened tortilla (dampened lightly with sauce). Place about 1/4 cup of the seasoned shredded chicken mixture in a line down the center.
-
The Cheese: Sprinkle a generous pinch of shredded cheese over the chicken filling. (Save about 1 cup of cheese for the top!)
-
The Roll: Roll the tortilla tightly and place it seam-side down into the prepared baking dish.
-
Repeat: Continue this process, tightly packing the rolled enchiladas side-by-side in the dish. A $9 \times 13$ pan should comfortably fit 12-14 enchiladas. 🎯
🌶️ step 4: the final sauce bath and bake
This step turns your simple rolls into the gooey, saucy dish shown in the picture!
-
Sauce Layer 1 (Red): Pour the remaining red enchilada sauce over the first half of the rolls (or pour down one side of the dish). Make sure the sauce coats the top and drips down the sides.
-
Sauce Layer 2 (Green): Pour the remaining green enchilada sauce / salsa verde over the second half of the rolls (or the other side of the dish). This is how you achieve the beautiful, split “Christmas Style” look! 🎄
-
Cheese Blanket: Distribute the remaining 1 cup of shredded cheese evenly over the top of all the sauced rolls. This creates that irresistible, golden, melted crust. 🧀☀️
-
Bake Time: Cover the baking dish tightly with aluminum foil. Bake for 20 minutes.
-
Uncover & Brown: Remove the foil and bake for an additional 5-10 minutes, or until the cheese is beautifully melted, bubbly, and slightly browned on the edges, just like the image! 🔥
-
Rest: Remove the enchiladas from the oven and let them rest for 5-10 minutes. This is essential to let the sauces settle and the enchiladas firm up slightly, making them easier to serve. 🙌
💡 pro tips for success
-
Corn vs. Flour: If you struggle with corn tortillas cracking, switch to flour. They are sturdier and easier to roll, though less traditional.
-
Add-ins: For a vegetarian twist, use black beans and corn instead of chicken. For a richer filling, add sautéed bell peppers and onions to the chicken mixture. 🧅🫑
-
Spice Level: If your store-bought sauces are too mild, stir in a dash of cayenne pepper or a can of drained diced green chilies into the chicken filling. 🥵
-
Make Ahead: Enchiladas are fantastic for meal prep! Assemble the entire dish (Steps 1-3), cover tightly with plastic wrap and foil, and refrigerate for up to 24 hours. Add 10-15 minutes to the covered baking time. 📅
(End of Page 2. Continue to Page 3 for serving suggestions, storage, and SEO focus.)
page 3: serving, storage & seo mastery 📈
🍽️ step 5: serving the feast
Enchiladas are a complete meal on their own, but a few simple toppings and sides elevate the experience!
must-have garnishes 🥑
-
Sour Cream/Crema: A dollop on top for a creamy, cooling contrast. 🍦
-
Fresh Cilantro: Chopped, brightens the flavor. 🌿
-
Diced Red Onion or Scallions: For a little sharp crunch.
-
Avocado or Guacamole: Essential for that buttery freshness. 🥑
classic side dishes 🍚
-
Mexican Rice (Arroz Rojo): The perfect pairing.
-
Refried Beans (Frijoles Refritos): A classic, hearty side.
-
Simple Salad: A light salad with a lime vinaigrette cuts through the richness. 🥗
🧊 storage and reheating
This recipe is excellent for leftovers and meal prep!
-
Refrigeration: Store any remaining enchiladas in an airtight container in the fridge for 3-4 days.
-
Reheating (Best Method): Preheat your oven to $350^\circ F$ ($175^\circ C$). Place the desired portion in a small, oven-safe dish, cover loosely with foil, and bake for 15-20 minutes until heated through.
-
Freezing (Freezer-Friendly Meal!): Assemble the enchiladas (Steps 1-3) in a foil-lined, disposable baking dish before adding the top layer of cheese and baking. Freeze the entire dish. Once frozen solid, lift the foil and enchiladas out, wrap them tightly, and put them back in the freezer for up to 3 months.
-
To Cook from Frozen: Unwrap, place back in the baking dish, cover with foil, add the top cheese layer, and bake at $375^\circ F$ ($190^\circ C$) for about 45-60 minutes. 🥶
-
🔑 seo optimization focus
This detailed guide ensures high visibility for home cooks searching for the perfect enchilada recipe!
| SEO Keyword Focus | Why It Matters |
| Chicken Enchiladas Recipe | The primary search term. Used in the title and throughout. |
| Homemade Enchilada Sauce | Targets users looking for scratch-made flavor. Mentioned as an alternative. |
| Christmas Style Enchiladas | Targets a niche, authentic New Mexican style seen in the photo. Used in the title. |
| Easy Mexican Dinner | Appeals to cooks looking for simple, comforting weeknight meals. |
| Freezer-Friendly Enchiladas | Important for meal preppers and batch cooking. Dedicated section on storage. |
| Best Cheesy Enchiladas | Emotional keywords reflecting the appetizing nature of the dish. |
🎉 enjoy your masterpiece!
There you have it! A comprehensive, three-page guide to creating the succulent, cheesy, and beautifully sauced Christmas-Style Chicken Enchiladas shown in your picture. Get ready for a standing ovation from your family and friends! 👏