- December 6, 2025
Irresistible Green Chile Chilaquiles Loaded with Melted Cheese
Imagine golden-crisp tortilla pieces swimming in vibrant green chile sauce, generously blanketed with melting cheese, crowned with perfectly cooked eggs, and finished with cool crema and fresh garnishes—this is chilaquiles taken to extraordinary cheesy heights.
In traditional Mexican homes, chilaquiles represent the ultimate breakfast celebration—especially on leisurely weekend mornings. This elevated version, featuring fire-roasted tomatillos, authentic Hatch chile, and an abundance of gooey cheese, combines nostalgic comfort with pure indulgence in every satisfying bite.
What Makes This Recipe Exceptional
- Bold homemade sauce crafted from roasted tomatillos and genuine Hatch chile powder
- Abundant cheese creating those irresistible stretchy, melted moments
- Perfectly textured tortillas simmered just enough to absorb flavor while maintaining crispness
- Customizable toppings including eggs, crema, radish, and fresh cilantro for brightness
- Versatile timing ideal for brunch gatherings, weeknight dinners, or anytime cravings strike
Complete Ingredient List (Serves 4)
For the Green Chile Sauce Base
- 1 lb tomatillos, cored and roughly chopped
- 1¼ cups white onion, chopped
- 4 garlic cloves
- 4 green onions, roots trimmed
- 2 tsp Mexican oregano
- 1¼ cups fresh cilantro leaves, chopped
- ¼ cup Green New Mexico Hatch chile powder
- ½ fl oz extra virgin olive oil
- 1 tsp sea salt
- ½ tsp ground black pepper
For Preparing the Chips
- 20 corn tortillas
- 2 cups neutral oil for frying (vegetable, canola, or peanut oil work well)
For Assembly and Finishing Touches
- 4 large eggs (for frying or poaching)
- ¼ cup crumbled cotija cheese (queso fresco or Monterey Jack make excellent substitutes)
- ¼ cup Mexican crema
- Fresh cilantro leaves for garnish
- Shaved radish for garnish
Required Kitchen Equipment
- Sheet pan with aluminum foil
- Blender or food processor
- Large skillet or deep cast-iron pan
- Tongs or slotted spoon
- Sharp knife and cutting board
Detailed Step-by-Step Instructions
Creating the Roasted Tomatillo Sauce
Set your broiler to high heat. Arrange the tomatillos, white onions, garlic cloves, and green onions across a foil-lined baking sheet. Broil the vegetables, tossing them periodically, until they develop softness and attractive charred spots—approximately 8-10 minutes depending on your broiler's intensity.
Blending the Vibrant Sauce
Transfer all roasted vegetables into your blender. Add Mexican oregano, fresh cilantro, Hatch chile powder, sea salt, and black pepper. If mixture seems too thick, add a small amount of water. While the blender runs, gradually stream in the extra virgin olive oil to create a smooth emulsion. Process until completely smooth, then set aside.
Preparing Fresh Tortilla Chips
Stack your corn tortillas and slice them into 3 equal strips, then cut crosswise to create rectangles—you'll have roughly 60 pieces total. Heat the neutral frying oil in your skillet over medium-high temperature. Test oil readiness by dropping in one piece—immediate bubbling indicates perfect temperature. Working in manageable batches, fry tortilla pieces until they achieve golden crispness, about 1-2 minutes per batch. Remove to paper towels for draining.
Combining Sauce and Chips
If necessary, wipe your skillet clean before pouring in the prepared green chile sauce. Heat to a gentle simmer over medium temperature. Add the fried tortilla pieces, stirring carefully to ensure even coating. Allow chips to simmer just long enough to absorb sauce—approximately 2-3 minutes—while maintaining some textural crunch.
Incorporating Eggs and Cheese
Create 4 separate wells throughout the chile-coated chips. Carefully crack one egg into each well and cook gently until whites become opaque and set while yolks remain luxuriously soft. Remove pan from heat source.
Distribute crumbled cheese generously across the entire dish, allowing residual heat to melt it slightly. Add dollops of Mexican crema across each serving portion.
Final Garnishing
Crown your creation with fresh cilantro leaves and paper-thin radish slices for visual appeal and textural contrast. Serve immediately while everything remains hot and saucy.
Perfect Serving Accompaniments
- Pair with refried beans, Mexican rice, or a crisp green salad
- Enhance with sides of fresh pico de gallo, sliced avocado, or red salsa
- Offer fresh lime wedges and chopped jalapeños for those desiring extra heat
Storage and Reheating Guidelines
- Optimal enjoyment: Best consumed fresh, as chips gradually soften over time
- Sauce storage: Refrigerate prepared sauce separately in airtight container for up to 3 days
- Reheating strategy: Prepare fresh tortilla chips and gently warm sauce separately before reassembling
- Make-ahead tip: Store sauce components separately; assemble just before serving for best texture
Professional Tips for Outstanding Results
- Maximize char flavor – thorough roasting of vegetables adds complexity and natural sweetness
- Control simmer time – brief sauce exposure keeps chips from becoming mushy
- Maintain oil temperature – frying in small batches ensures consistent crispness
- Source quality ingredients – particularly authentic New Mexico green chile powder makes significant difference
- Customize freely – scrambled eggs, various cheese types, crema, sliced radish, and cilantro all enhance the experience
Frequently Asked Questions
Can I bake the tortillas rather than frying?
Absolutely—lightly brush tortillas with oil and bake at 425°F for 10-15 minutes until crisp, then combine with warmed sauce.
Does this recipe scale well for larger groups?
Definitely! Simply double all ingredients to serve more guests—just work in larger cooking batches.
How spicy is this dish?
Spice level depends entirely on your chile powder choice. Select mild powder for gentle heat, medium or hot varieties for bolder flavor.
Is this suitable for vegetarians?
Yes—simply omit eggs (or use them if your vegetarian diet allows) and consider vegetable broth if thinning sauce. The cheese-focused version remains hearty and satisfying.
What if I can't find Hatch chile powder?
Substitute with another quality green chile powder or use roasted poblano peppers blended into the sauce for similar flavor profile.
Final Reflections
These Green Chile and Extra Cheese Chilaquiles transform everyday ingredients into extraordinary comfort food. They're equally perfect for leisurely brunch gatherings, satisfying weeknight dinners, or special weekend treats—delivering bright roasted vegetable flavors, crispy-yet-tender tortillas, luxurious melted cheese, and optional silky eggs all in one stunning skillet presentation.
Whether sharing with friends around your table or savoring solo, these chilaquiles represent a delicious celebration of authentic Mexican ingredients and time-honored cooking techniques.
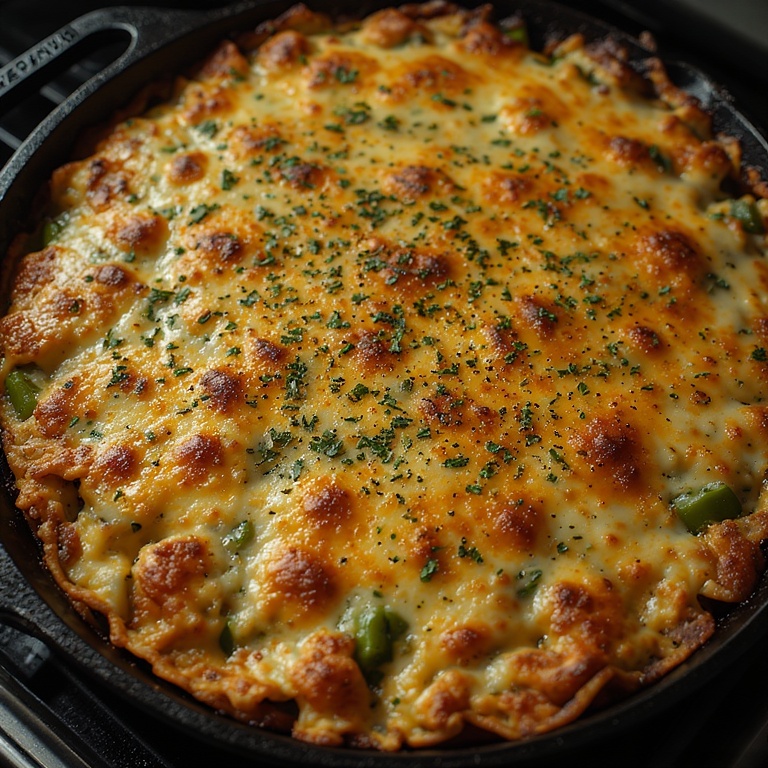
Complete Recipe: Green Chile and Extra Cheese Chilaquiles
Crispy corn tortillas bathed in vibrant Hatch chile sauce and topped with generous cheese and eggs—authentically flavored chilaquiles that satisfy completely!
Prep Time: 20 minutes
Cook Time: 15 minutes
Total Time: 35 minutes
Servings: 4
Course: Appetizer, Lunch, Main Dish
Cuisine: Mexican
Ingredients
Green Chile Sauce Base
- 1 lb tomatillos, cored and roughly chopped
- 1¼ cups white onion, chopped
- 4 garlic cloves
- 4 green onions, roots removed
- 2 tsp Mexican oregano
- 1¼ cups cilantro leaves, chopped
- ¼ cup Green New Mexico Hatch chile powder
- ½ fl oz extra virgin olive oil
- 1 tsp sea salt
- ½ tsp ground black pepper
Chips and Frying
- 20 corn tortillas
- 2 cups neutral oil for frying (vegetable, canola, or peanut oil)
Assembly & Finishes
- 4 large eggs (fried or poached)
- ¼ cup crumbled cotija cheese (or queso fresco/Monterey Jack)
- ¼ cup Mexican crema
- Fresh cilantro leaves for garnish
- Shaved radish for garnish