Step-by-Step Instructions
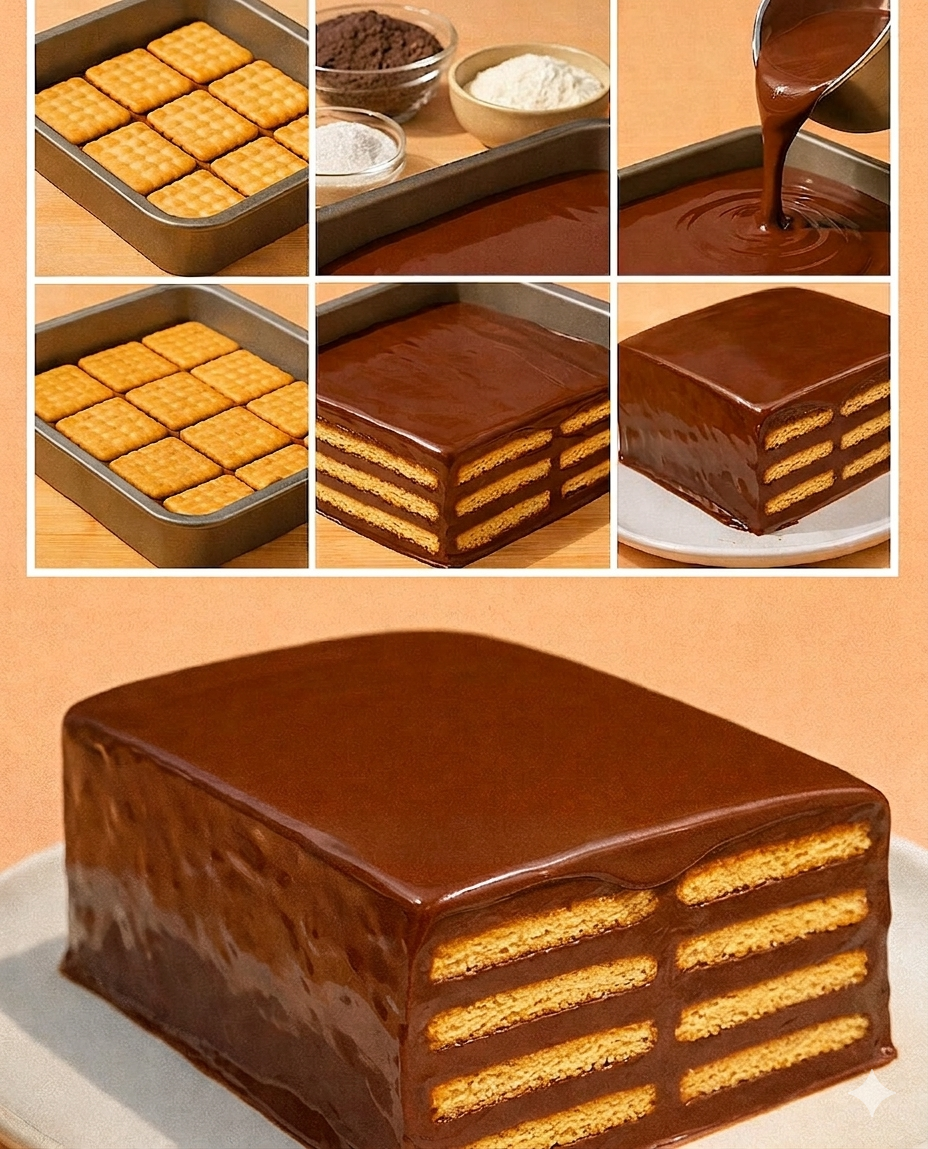
1. Prepare the Chocolate Base In a medium saucepan, whisk together the sugar, cocoa powder, and cornstarch. Gradually pour in the milk while whisking constantly to ensure there are no lumps. Place the pan over medium heat. Continue to stir until the mixture begins to thicken and reaches a gentle boil.
2. Add the Gloss and Flavor Once the mixture has thickened into a smooth pudding-like consistency, remove it from the heat. Immediately add the butter, chocolate chips (if using), and vanilla extract. Stir vigorously until the butter and chocolate have completely melted, leaving you with a dark, glossy, and aromatic cream.
3. Layer the Biscuits Line a square or rectangular baking dish with parchment paper (this makes it much easier to lift the cake out later). Spread a thin layer of the chocolate cream at the bottom of the dish to act as an “anchor.” Place a single layer of biscuits over the cream. If you prefer a softer cake, quickly dip each biscuit in a bowl of milk for one second before placing it down.
4. Build the Stack Pour a generous layer of chocolate cream over the first layer of biscuits, spreading it evenly to the edges. Repeat this process—biscuit layer, then chocolate layer—until you have used all your ingredients. Aim for at least 4 to 5 layers to get that beautiful “striped” look when sliced.
5. The Final Coat Pour the remaining chocolate cream over the top, ensuring it covers the biscuits entirely. Use a spatula to smooth the surface for a mirror-like finish.
Cooling and Serving Tips
The Secret is Patience While it’s tempting to dive in immediately, this cake needs time to set. Place it in the refrigerator for at least 4 to 6 hours, though overnight is best. This allows the biscuits to soften just enough to be “cake-like” while the chocolate firm up into a fudge-white consistency.
The Perfect Slice To get those clean, sharp layers shown in the photos, use a sharp knife dipped in hot water and wiped dry between each cut. The contrast between the golden biscuits and the dark chocolate is what makes this dessert so visually stunning.
Customization Ideas
-
Nutty Crunch: Sprinkle crushed hazelnuts or walnuts between the layers.
-
Coffee Infusion: Add a teaspoon of espresso powder to the chocolate mixture to intensify the cocoa flavor.
-
Salted Caramel: Drizzle a little salted caramel over the final layer before chilling.